Setting Up a Guaranteed Direct-Sold Campaign and Line Items
Guaranteed Direct Sold campaigns ensure that a sponsor receives placement in a publisher’s ad unit. They represent one of two main types of Direct Sold campaigns you can run (the other is a Non-Guaranteed Direct Sold campaign). In this article, we will walk you through how to set up a Guaranteed Direct Sold campaign.
This article covers:
- Create a Campaign
- Create a Line Item (Basics)
- Ad Targeting to a Line Item
- Link Ad Slots and Packages to a Line Item
- Map Creatives to Specific Ad Slots (optional)
Create a Campaign
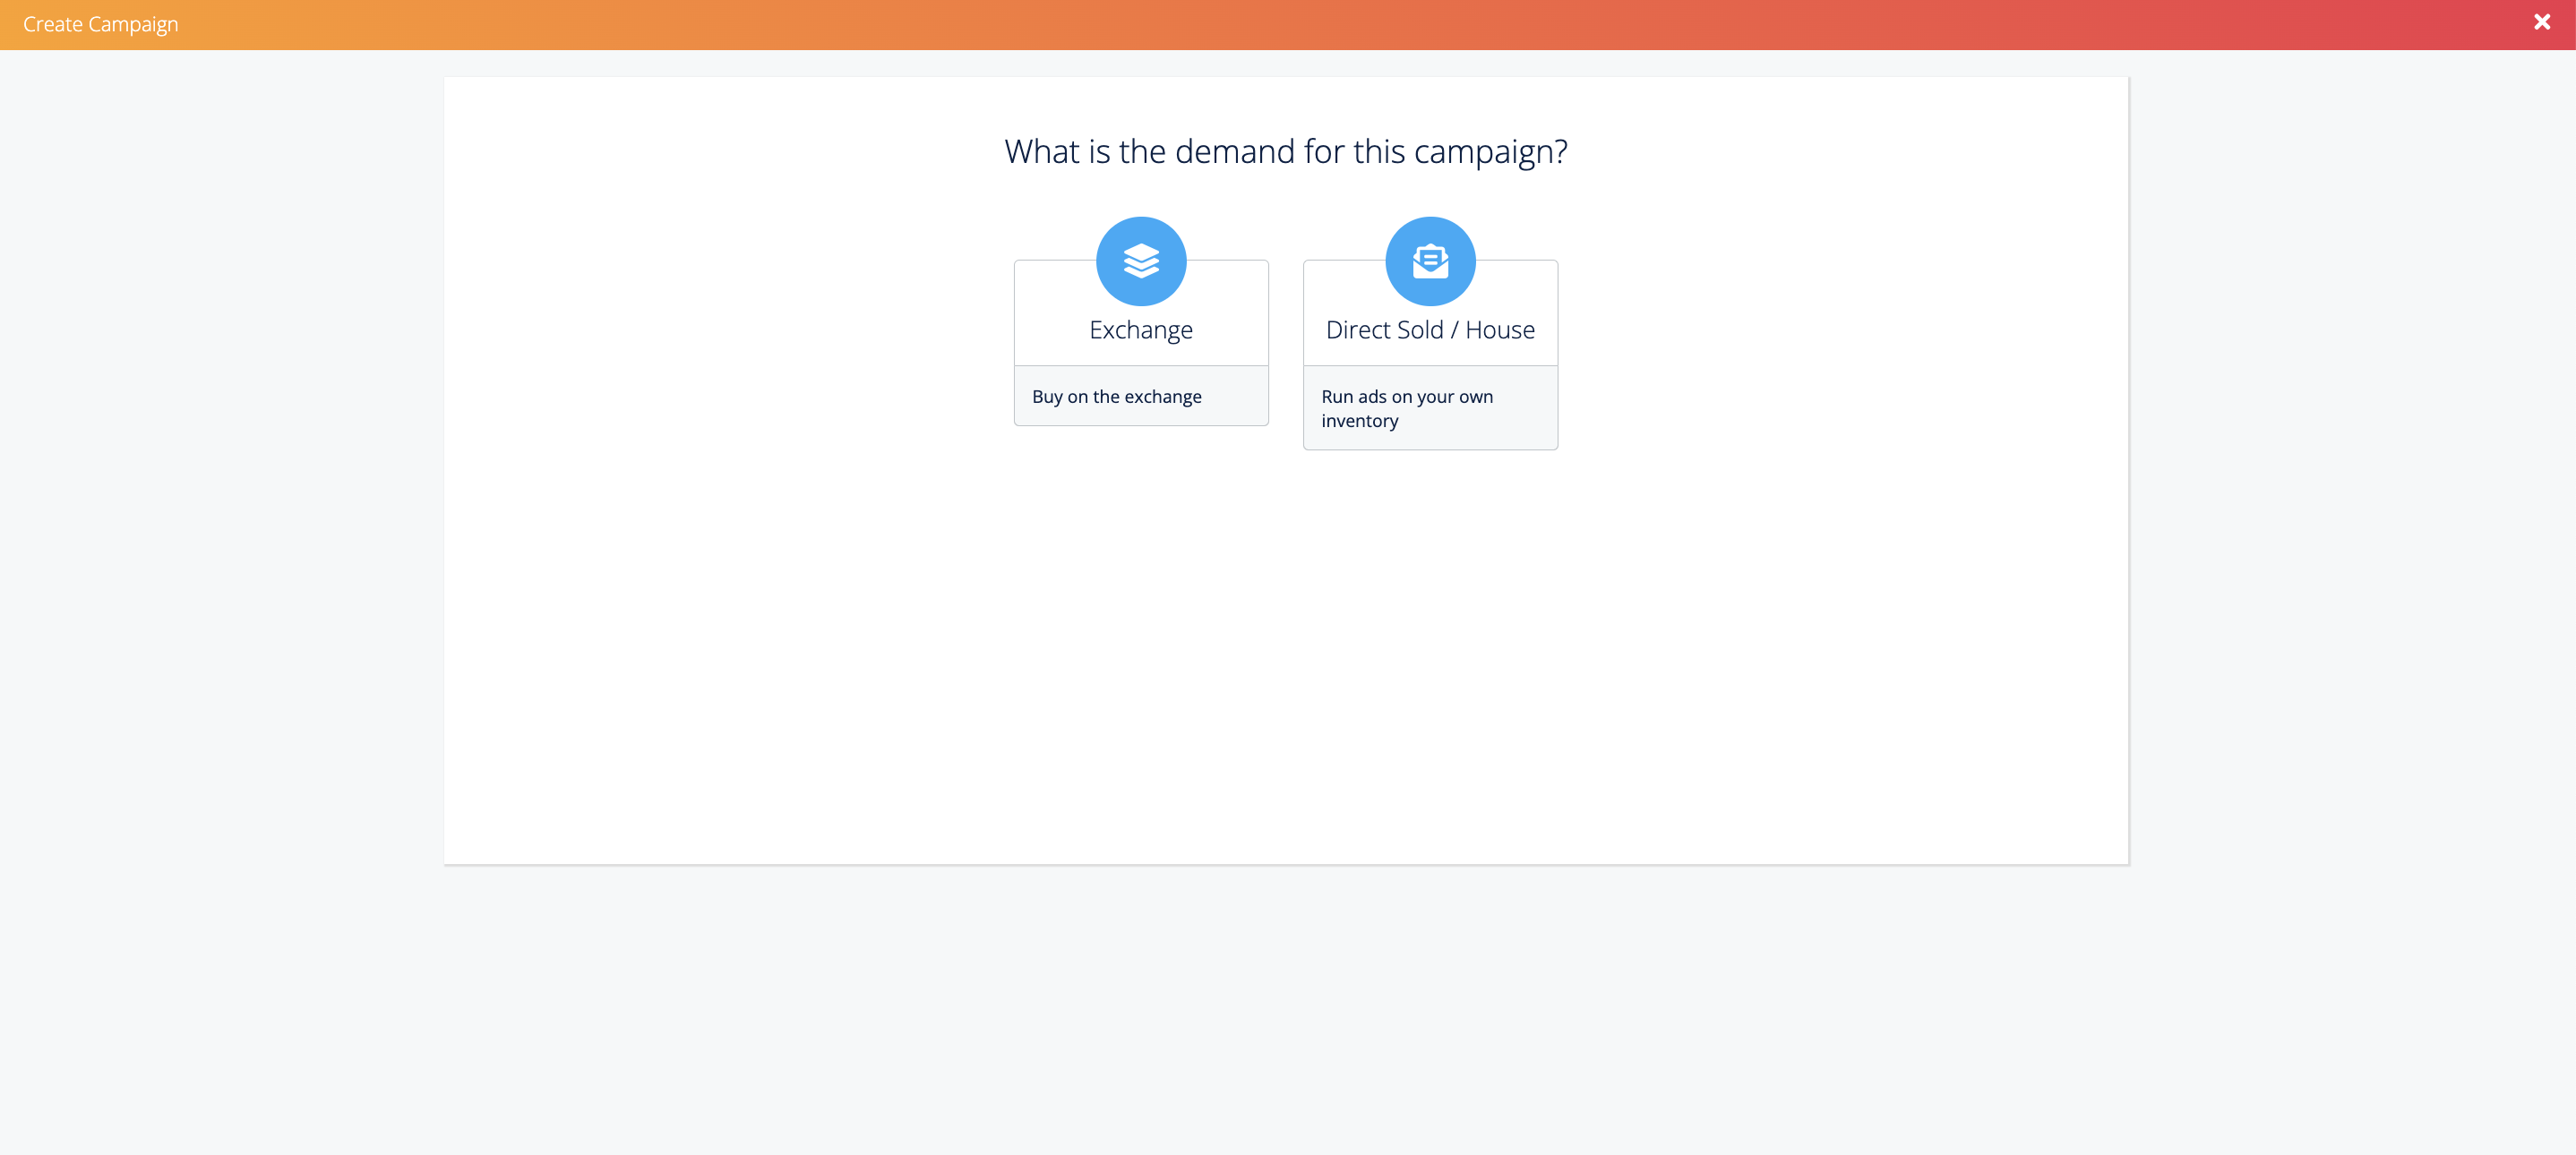
1. Click the ‘Create Campaign’ Button from the desired Advertiser page
2. Select the ‘Direct Sold’ Option
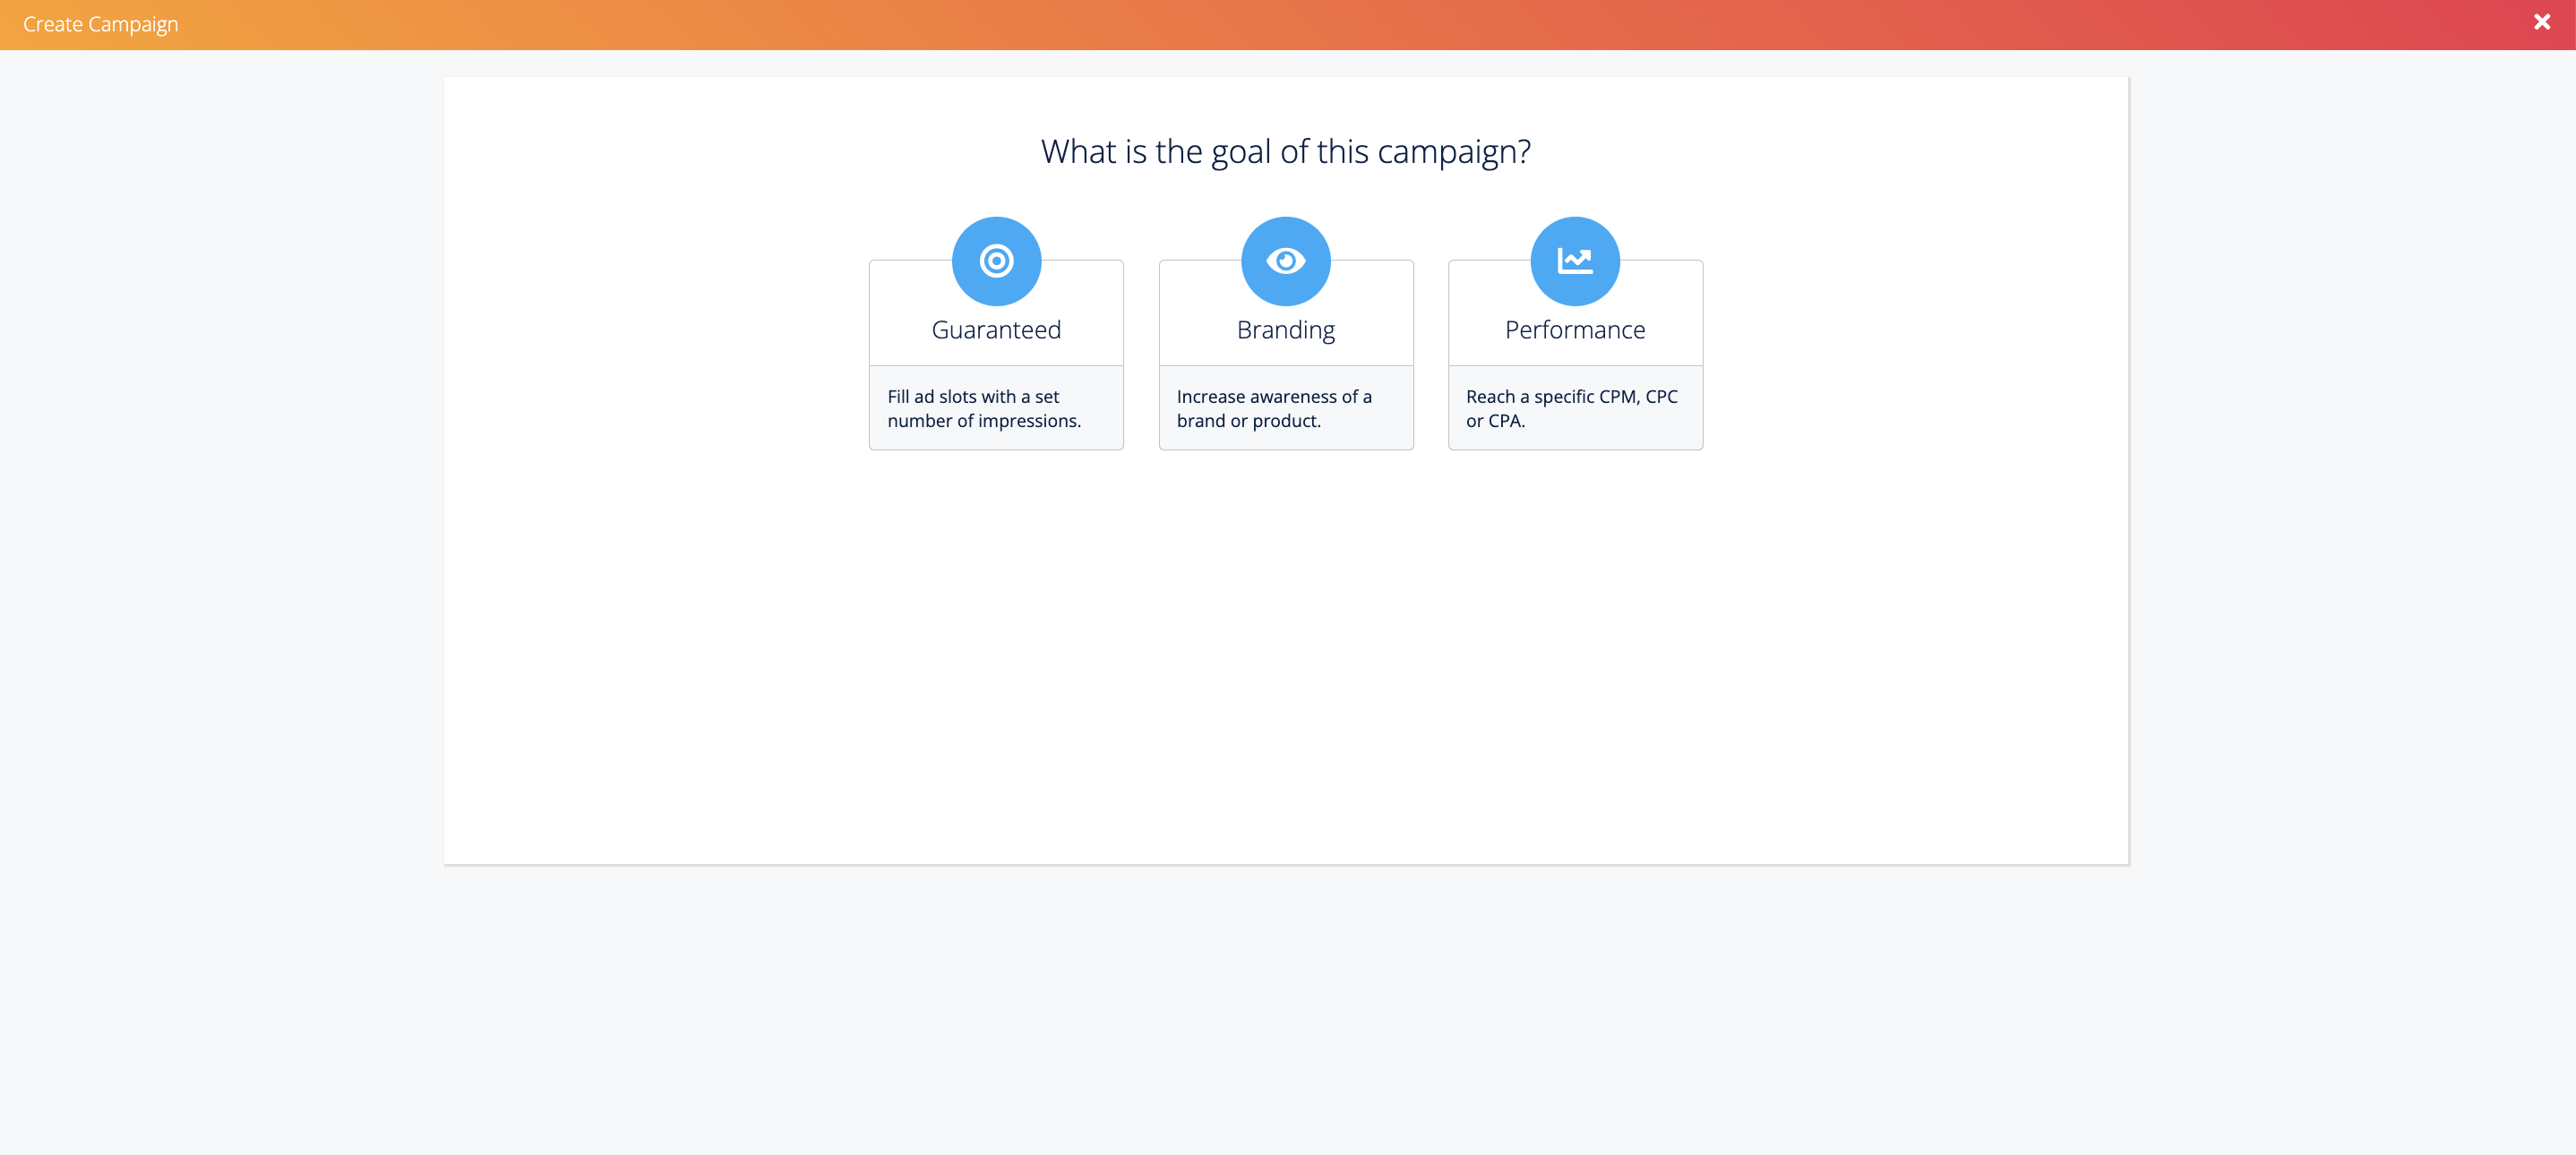
3. Select the “Guaranteed” option.
4. Fill out the required campaign fields.

- Campaign Name: Enter the name of your campaign.
- Conversion Tracker: Add any conversion trackers you’ve generated if you would like to track conversions.
- Frequency Cap: Determines the number of times an ad will be shown to a given person during an hour, day, week, or month.
- Campaign Label: This is a non-searchable field that you can use to label details about your campaign.
- Start Date: Set the start date of your campaign. Any line items under your campaign will have to start on or after this date.
- End Date: Set the end date of your campaign. Any line items under your campaign will have to end on or before this date.
- Budget: Select “Impressions,” “Adjusted Impressions,”* or “Currency (Ad Spend)” and enter your desired value. This will serve as a ceiling to your campaign’s spend so make sure it meets or exceeds your desired # of impressions.
- Select “Unlimited Budget” if you do not want to set a maximum spend. This setting will remove the spending ceiling and pacing checks. Please note that guaranteed campaigns with an unlimited budget are eligible to take all the impressions available for their duration.
- Once a guaranteed direct-sold campaign with an Unlimited Budget is saved, it will not be able to be edited. A new campaign will need to be created. Learn more about Unlimited Budget here.
- *Click here for more information on Adjusted Impressions and MPP.
- CPM: Enter a CPM goal here. This CPM goal merely acts as a reference and won’t have any impact on serving impressions.
Create a Line Item (Basics)
Click Create Line Item (or ‘Save and Exit’, if you don’t want to create a Line Item at this time) and fill out the required fields. There are four sections: Basic Details, Schedule and Budget, Targeting, and Linked Creatives.
Basic Details

- Parent Campaign: If you “create a line item” from the campaign setup page, this section will automatically populate with the campaign you just created.
- Line Item Name: Choose a name for your line item
- Status: Choose from three options – Active, Inactive, or Paused.
- Active – This Line Item will run during the specified flight dates, and data will be available in the Reporting section of Campaign Manager. Your campaign will also spend once saved.
- Paused – This Line Item will no longer run during the specified flight dates. Reporting data will be pulled into the Reporting section. Your campaign will not start spending after the line item is saved.
- Inactive – This Line Item will no longer run during the specified flight dates. Reporting data will not be pulled into the Reporting section. Your campaign will not start spending after the line item is saved.
- “Inactive” vs “Paused”: The difference between the two is only relevant once a campaign has begun to serve. Once it has, setting your campaign to “inactive” will ensure that no residual impressions (impressions from users who open a newsletter from a forward) are served. These residual impressions can occur if your campaign is set to “paused.”
- Line Item Label: This is a non-searchable field that you can use to label details about your line item.
- Priority: Here you can set the line item’s priority within a campaign. Priority levels range from 1 to 5 with line item’s assigned priority 1 serving first. All line items are assigned priority level 3 by default. Learn more about Priority levels here.
- If there are multiple campaigns containing prioritized line items, the auction hierarchy will go as follows:
- Priority 1 campaigns
- Priority 2 campaigns
- Priority 3 campaigns
- Priority 4 campaigns
- Priority 5 campaigns
- Share of Voice will only take over after line item priorities have been filled.
- If there are no guaranteed campaigns, then one of the following will occur [based on your newsletter settings]:
- Exchange demand will serve
- A non-guaranteed direct sold or house campaign will serve
- Ad slot will collapse
- If there are multiple campaigns containing prioritized line items, the auction hierarchy will go as follows:
- Coordinated Sponsorship Eligible: Toggle this feature on to utilize the workflow to coordinate ad slots for a campaign. Learn more about this feature here.
Schedule and Budget
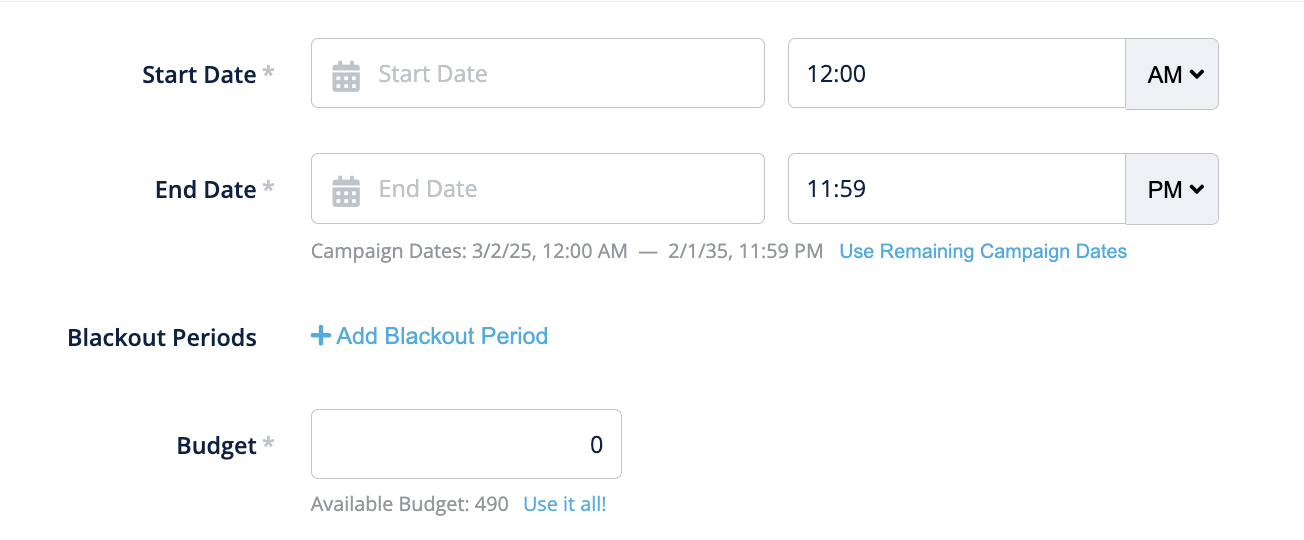
- Start Date: Choose the start date for your line item. The line item will start at 12 AM unless otherwise specified.
- End Date: Choose the end date for your line item. The line item will end at 11:59 PM unless otherwise specified.
- Blackout Periods: Auto schedule when this line item should be active/inactive.
- Click “+ Add Blackout Period” to open the scheduling window.

- Enter the start and end date/time for the line item to be inactive/resume serving.
- The start date needs to be either today or in the future within the confines of the line item flight dates.

- Times are in Eastern Standard/Daylight Time Zone.
- Once valid dates are added, click ‘Save.’ You can then add more dates or edit/delete ones previously created.
- Line Item Detail page shows the current or upcoming blackout periods starting in the next 7 days.
- Budget: Enter the maximum number of impressions you would like to serve.
- Please note: If Unlimited Budget is checked for this campaign budget will be locked.
- Daily Cap: Set a daily budget limit for your line item.
- Please Note: If an Unlimited Budget is set, Daily Cap will not be available.
- Pacing: You have two pacing options — even or ASAP.
- Even pacing will spend the budget evenly over the duration of a campaign, while ASAP pacing will to try to spend the impression budget a quickly as possible.
- For guaranteed campaigns, we recommend using ASAP pacing.
- Please Note: If an Unlimited Budget is set, pacing will lock as ASAP.

Targeting
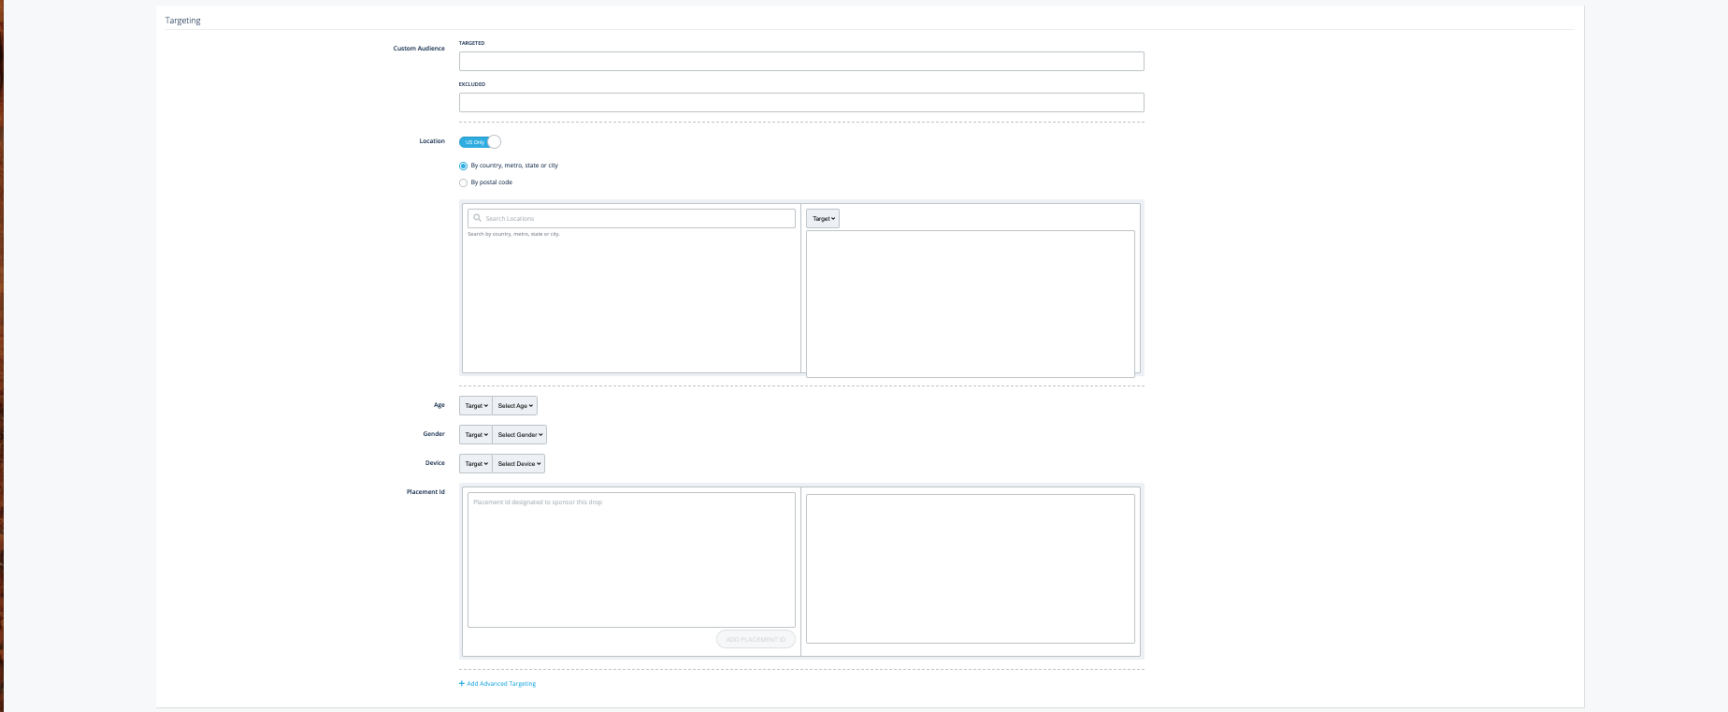
- Custom Audience: Target or Exclude your audience segments.
- LiveRamp: Target or Exclude your LiveRamp 1st-party segments.
- Location: Select US-only, or Global targeting.
- You can select Targeting by country, metro, state or city OR by postal code (you cannot select by both). Then search locations to target or exclude.
- Note: The targeting option defaults to US-only. If you’d like to select Global targeting, you’ll need to move the radio button to the Global targeting option.
- Age: Target or Exclude Age groups.
- Best Practice: If you wish to target a specific age, we’d suggest excluding all unwanted ages by utilizing the “Exclude” feature; this will allow for greater scale.
- Gender: Target or Exclude by Gender
- Best Practice: If you wish to target a specific gender, we’d suggest excluding all unwanted genders by utilizing the “Exclude” feature; this will allow for greater scale.
- Device: Target or Exclude by Device
- Placement ID: Target or Exclude by Placement ID
- Advanced Targeting: You can target or exclude by the following:
- Browser
- Bundle
- Category
- Day & Time
- Device Maker
- ISP
- OS
- List ID
- Key Value Pairs
Linked Creatives (optional)

If you know the creatives you want to add to the line item, you have the option of adding them here. Creatives are not required in order for you to save your line item. You can add creatives from the ‘Line Item Details’ page at a later date.
Click ‘Save’ once you’re satisfied with the line item details.
Link Ad Slots and Packages to a line item
Once you have set up the basic details for a line item, you will be brought to the ‘Line Item Details’ page. On this screen, you can create an Audience Extension campaign. This feature allows you to seamlessly extend your direct sold campaigns to target your first party audience across the LiveIntent Exchange. To learn more about this process, click here.
Here you can also add ad slots and/or packages, and creatives to your line item. You must link ad slots or packages and creatives to the line item in order for it to run, but you can add them in whichever order works best for you.
Add Ad Slots
Scroll to the ‘Ad Slots’ section on the page to review the ad slots that are currently linked to the line item.
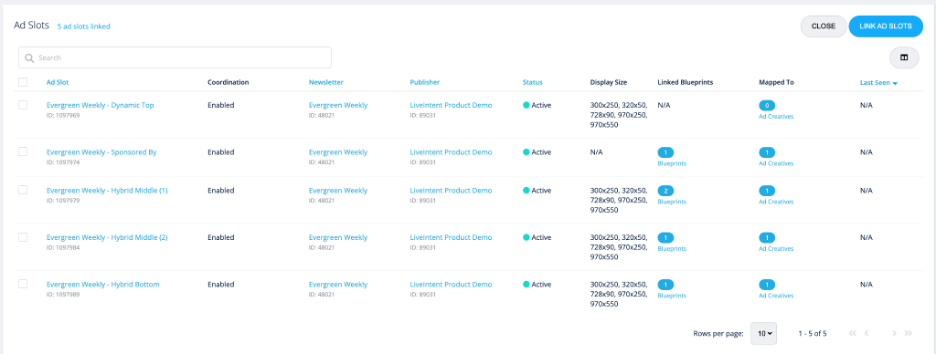
To add/remove ad slots from the line item, click the ‘Link Ad Slots’ button.
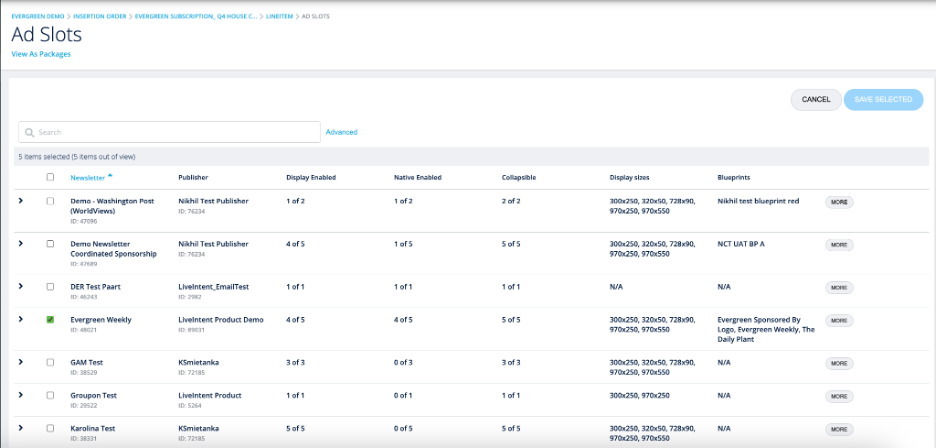
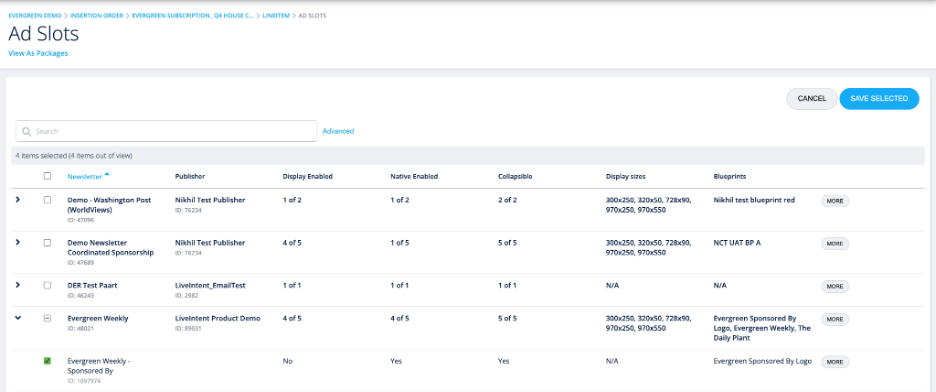
The ‘Linking Ad Slots’ page shows all the ad slots that can be linked to this line item, grouped by Newsletter. You have the option on this page to ‘View as Packages’ if you would prefer to add packages instead of ad slots to the line item (in the next section we’ll walkthrough adding packages to your line item).
To add ad slots to the line item
- The ad slots with the check-marked box are already linked to the line item.
- Search for the specific ad slot or newsletter in the search bar at the top, or select the newsletter from the list.
- Click on the carrot next to the newsletter name to see the individual ad slots you can select.
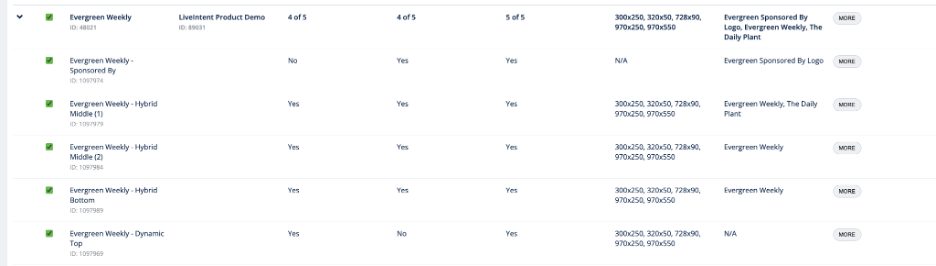
- Click on the box next to the ad slot name to add it to your line item.
- If you want to add all the ad slots in the newsletter, simply click on the box next to the newsletter name.
- Once you are done adding ad slots, click the ‘Save Selected’ button at the top right of the screen.
Add Packages
Note: Ad Slots that have been added to the line item as part of a package cannot be individually unlinked. In order to unlink those ad slots, the entire package will need to be unlinked.
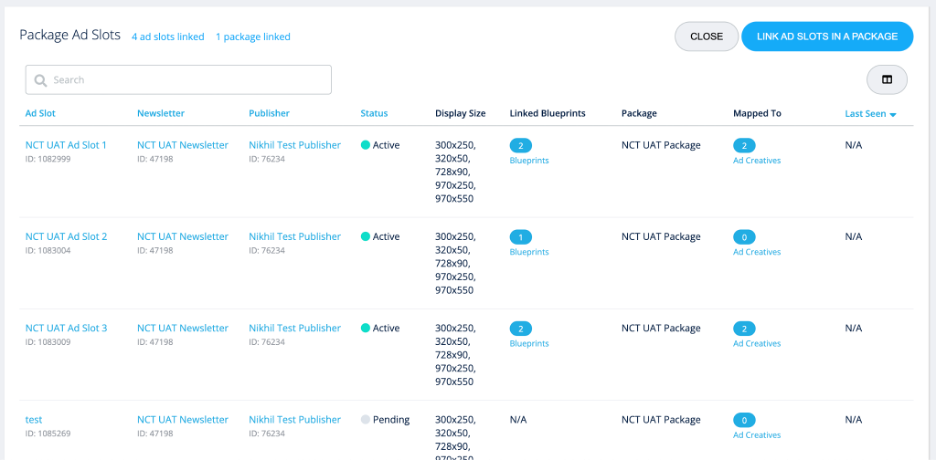
In the ‘Line Item Detail’ page, scroll to the ‘Package Ad Slots’ section. This shows the number of packages that are linked to the line item, and the columns show the individual ad slots that are part of those packages.
To add packages to a line item, click on the ‘Link Ad Slots in a Package’ button to navigate to the ‘Packages’ screen.
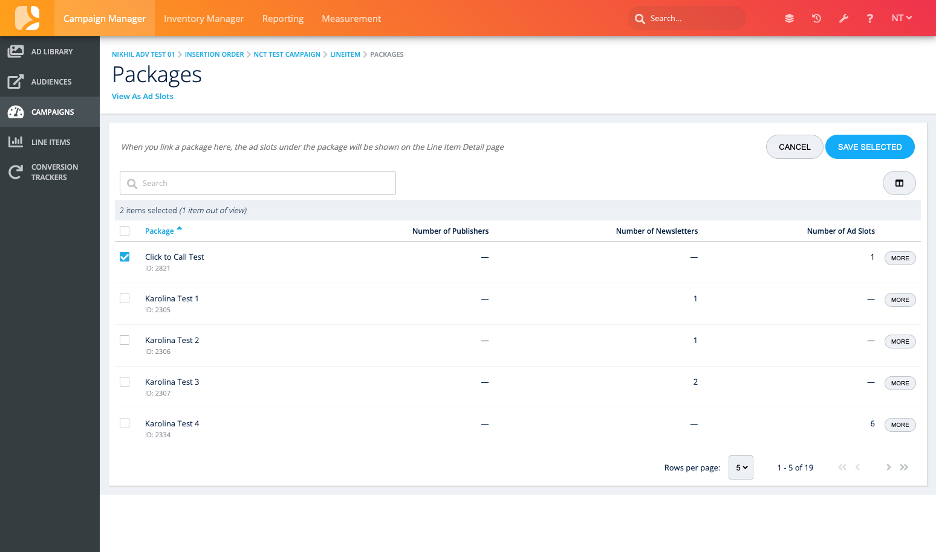
On the ‘Packages’ screen, the packages with a check-marked box next to them are already linked to the line item.
Click on the ‘More’ button next to the ‘Number of Ad Slots’ column to open the package details in a new window. Click on the check-box next to the package name to add it to your line item.
When you’ve made your selections, click the ‘Save Selected’ button.
Map Creatives to Specific Ad Slots (optional)
Creatives are automatically mapped to the ad slots linked in the line item where that creative is eligible to serve. If you’re unsure what ad formats and sizes your ad slots can serve, please review the settings on the Ad Slot details page.
If you want a creative to serve into a particular ad slot for a campaign, you have the option to map the creative to the specific ad slot. This feature is optional and is available with all Direct Sold/House line items. You can opt to not change any settings and let the default settings run.
Follow the below instructions to update your settings. Please note any updates you make are for the specific line item; it will not impact settings if the same creative is in other line items.
Best Practice: This feature is particularly useful if you’re running a sponsorship campaign and utilizing the Coordinated Sponsorship workflow. Learn more about Coordinated Sponsorship here.
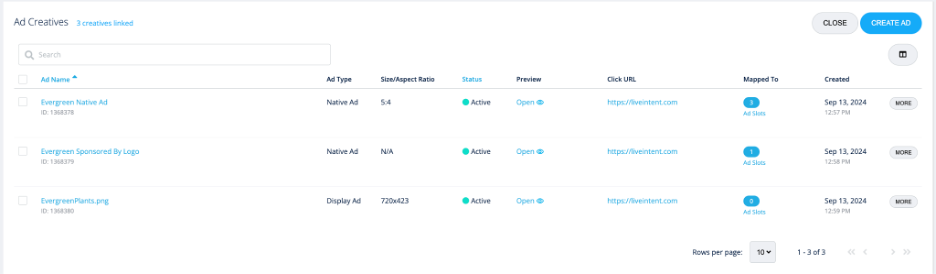
In both the ‘Ad Creatives’ and ‘Ad Slots’ sections of the ‘Line Item Details’ page you will see a column called ‘Mapped To.’
In the ‘Ad Creatives’ section, the number in this column represents the ad slots linked to this line item where this creative could appear. In the ‘Ad Slots’ section, the number represents the number of ad creatives linked to each ad slot.
- Note: An ad slot will only serve one creative at any open out of the eligible creatives.
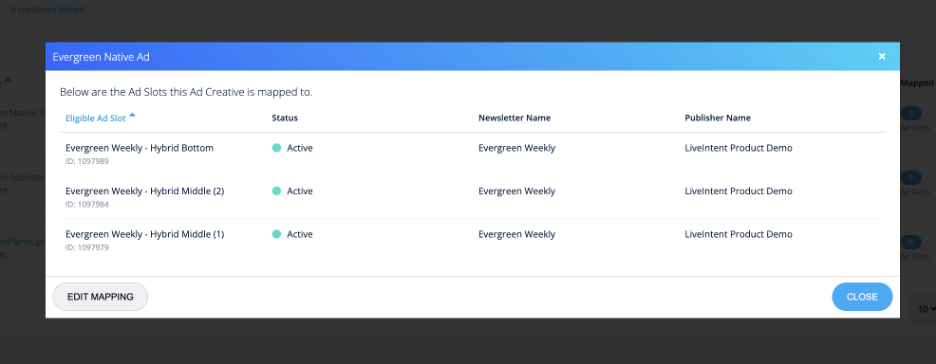
To view all of the eligible ad slots for a creative, click on the number in the column, and a pop-up screen will appear that shows the ad slots that the creative is mapped to by default. In order to edit/view the ad slots, click ‘Edit Mapping.’
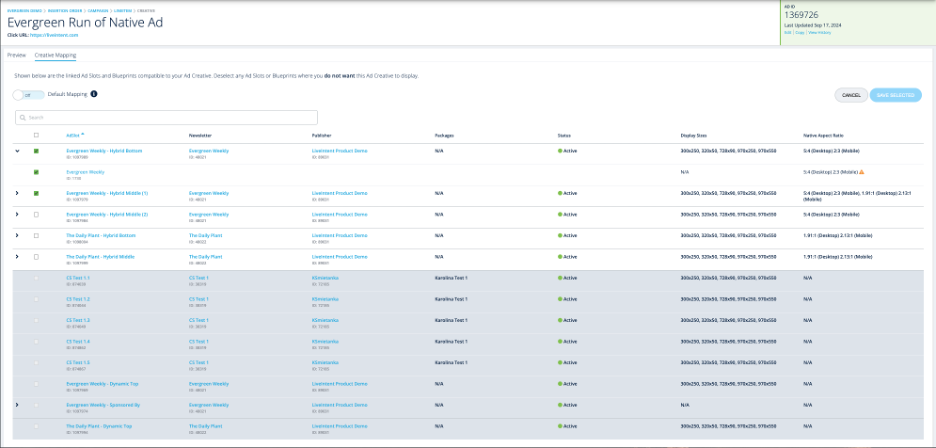
The ‘Creative Mapping’ screen shows all the linked ad slots in your line item. At the top, ‘Default Mapping’ is turned ‘On.’
- Note: Keep this ‘On’ if you want the platform to decide which ad slots are eligible for this creative. You can turn it ‘Off’ if you want to be more specific about where this creative serves.
Ad slots with a check-marked box are eligible for your creative to serve into, and any ad slots that are grayed out are ineligible for serving the selected creative. In order to deselect an ad slot(s), click on the check box.
Click the carrot next to the ad slots to view any blueprints that are linked to the ad slot. To deselect any blueprints, click on the check marked box.
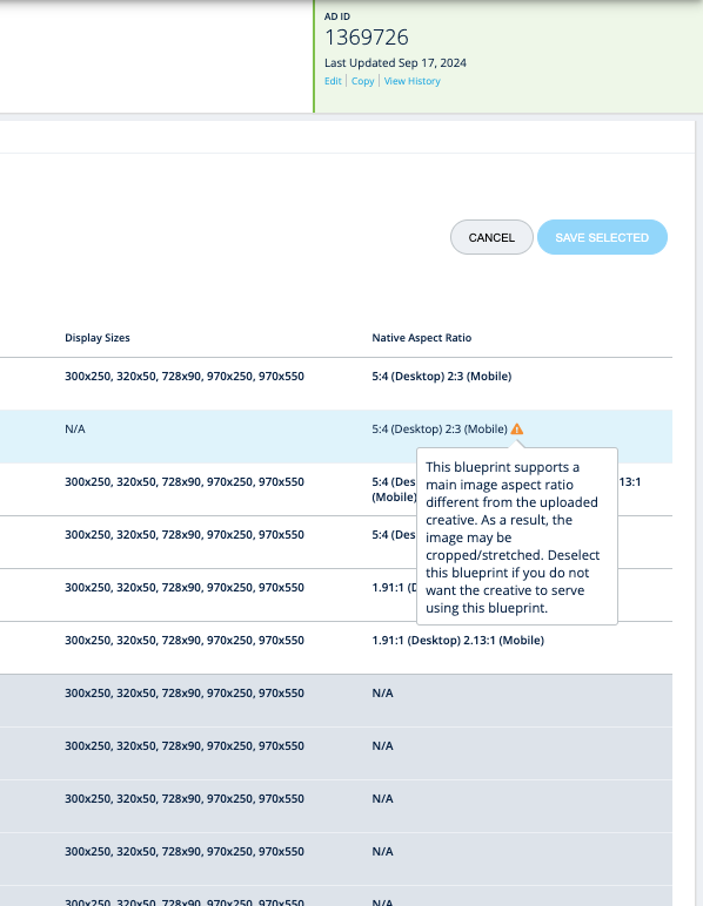
If the image in the native creative has a different aspect ratio then what’s supported in the blueprint, you will see this notification in the ‘Native Aspect Ratio’ column.
Once you are satisfied with your selections, make sure to click ‘Save.’ At least one ad slot will need to be mapped to a creative in order to save.