Setting Up Dynamic Product Ads in Tealium iQ
What is ‘Dynamic Product Marketing’?
Simply put, it’s a retargeting service that provides product recommendations to your visitors based on the products they’ve interacted with. The exact details from LiveIntent are covered here.
From a Tealium perspective, you have to make sure to give LiveIntent the data about the products a visitor interacted with in order for LiveIntent to be able to take action.
How to Set up Dynamic Product Marketing in Tealium iQ
To begin this process, you must already have a LiveIntent account (managed or self-service) and that you’ve set up your Product Catalog with your LiveIntent account rep. If you don’t do this, then LiveIntent won’t be able to accurately retarget based on the products a visitor has shown interest in.
Step 1: Set up LiveIntent’s LiveConnect Tag in Tealium iQ
You’ll need to add the LiveConnect Tag in Tealium iQ. If you’ve already added the LiveConnect Tag, you don’t need to add another instance; you can use the one that’s currently set up.
Note: You will want to make sure you’re on the latest version of the LiveConnect Tag template. To check what version you’re on, use the Tag Status Checker. If you’re not on the latest, you can update your template.
Step 2: Set up the Required Events
The Dynamic Product Marketing service requires you to fire three LiveIntent events: ViewContent, AddToCart, and Purchase.
Set up the ViewContent Event
This event indicates a visitor viewed a product and is usually fired on a product detail page. At the bare minimum, you must provide the content_ids and content_type parameters with this event for Dynamic Product Marketing. Details on how to set those parameters are below.
Since a ViewContent event is usually associated with the viewing of a product, we can tie this to a page load, so it’s useful to take a look at data sources present when the page load occurs.
1. Navigate to the Data Mappings tab of your LiveConnect Tag.
2. From the Data Sources drop-down, select a data source that uniquely identifies a product page. For this example, we’ll use page_type.
3. Since we’re setting up when to fire an event, click on the Events tab.
4. In the Trigger field, enter the value that page_type will have on a product page. In this example we’ll use “product detail page”.
5. From the Event drop-down, select ViewContent.
6. Click the green add button and you’ll see an orange text field show up with your mapping. Click Close to submit your mapping.

Note: You’ll have to save and publish in order to keep this setup.
Set up the AddToCart Event
This event indicates a visitor added a certain product to their cart/basket. This event also requires content_ids and content_type for Dynamic Product Marketing. Details on how to set those parameters are below.
The action of adding an item to a cart is usually tied to a button click on a product page. In order to fire an AddToCart event, you have to key off of the value of a data source for that event. In this example, let’s use a data source called event_name. To do this:
1. Navigate to the Data Mappings tab of your LiveConnect Tag.
2. Select the data source that indicates when an AddToCart event fires. In this example we’re using event_name.
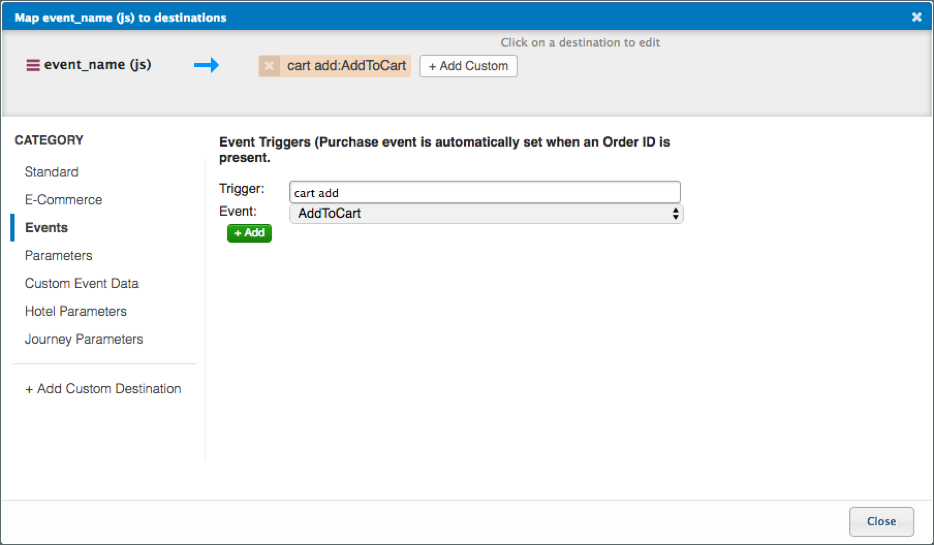
3. Since we’re setting up when to fire an event, click on the Events tab.
4. In the Trigger field, enter the value that event_name will have on an add-to-cart event. In this example we’ll use “cart add”.
5. From the Event drop-down, select AddToCart.
6. Click the green add button and you’ll see an orange text field show up with your mapping. Click Close to submit your mapping.
Note: You’ll have to save and publish in order to keep this setup.
The Purchase Event
If you have the E-Commerce extension set up, the Purchase event will automatically fire whenever an order ID is populated. If you don’t have the E-Commerce extension, then you’ll have to set up the Purchase event, much like you did with the ViewContent event. A mapping based off of page_type equaling “order confirmation” is an example.
Note: You do NOT have to set up a mapping for the Purchase event if you already have the E-Commerce extension set up with its order ID mapped.
Step 3: Set up Parameters to Send with Events
Each of these events also requires that you send certain parameters, namely content_ids and content_type.
Note: Just because only content_type and content_ids are required for Dynamic Product Marketing does not mean you can’t send more parameters with these events. Parameters such as value, content_name, and currency can help inform your analytics, and should not necessarily be ignored just because they’re not “required”. If you have the E-Commerce extension set up, these data sources will be automatically mapped for you.
The content_ids Parameter
These are the IDs or SKUs of the products viewed by your visitor. If you have the E-Commerce extension set up, then these are mapped and populated by the data source you’ve selected for the List of Product IDs field in the extension. If you don’t have the E-Commerce extension or you want to use another data source, then you’ll have to map a data source to the content_ids parameter for each of the 3 events.
The content_type Parameter
The content_type parameter indicates to LiveIntent whether the content/product IDs are for a single product or a group of products. You must set this parameter to “product”. This is a requirement specific to LiveIntent, so it’s unlikely you already have a data source that’s doing this for you. So, to accomplish this, you’ll have to use an extension, namely the Set Data Value extension.
To set content_type with a Set Data Value extension:
1. Add a Set Data Value extension.
2. Give the extension a good title such as, “LiveIntent: Setting content_type”.
3. Set the scope of the extension to your LiveConnect Tag. Since this is only needed for the LiveConnect Tag, we only need to run this extension when the LiveConnect Tag loads.
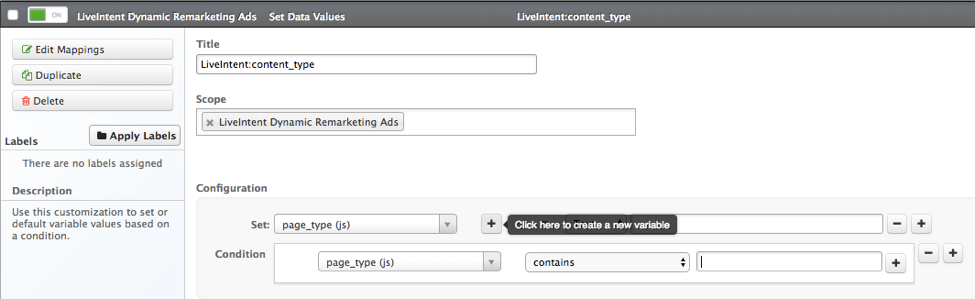
4. Click the plus button next to the “Set” drop-down. This will allow you to create a data source on the fly.
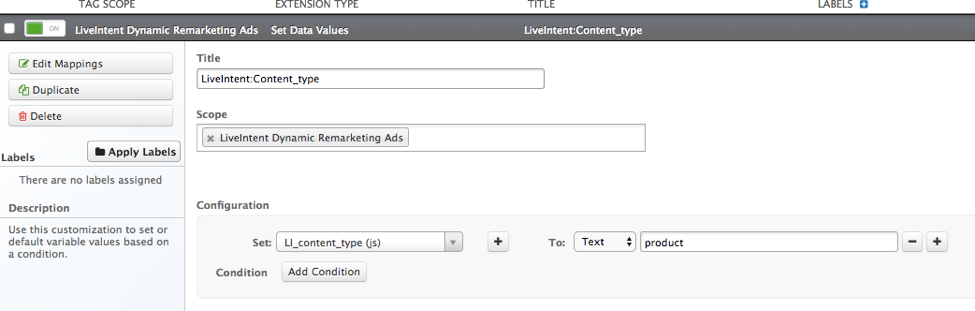
5. Give this data source a name like “li_content_type” since the purpose of this data source is to provide the value for content_type.

6. Leave the To: field selection at “Text” and type “product” in the text field. This depends on the nature of the IDs, as explained above.
7. Navigate to the Data Mappings tab of your LiveConnect Tag.
8. From the Data Sources drop-down, select your “li_content_type” data source.
9. Click on the Parameters tab. This allows you to set up the parameter mappings for the event of your choice.
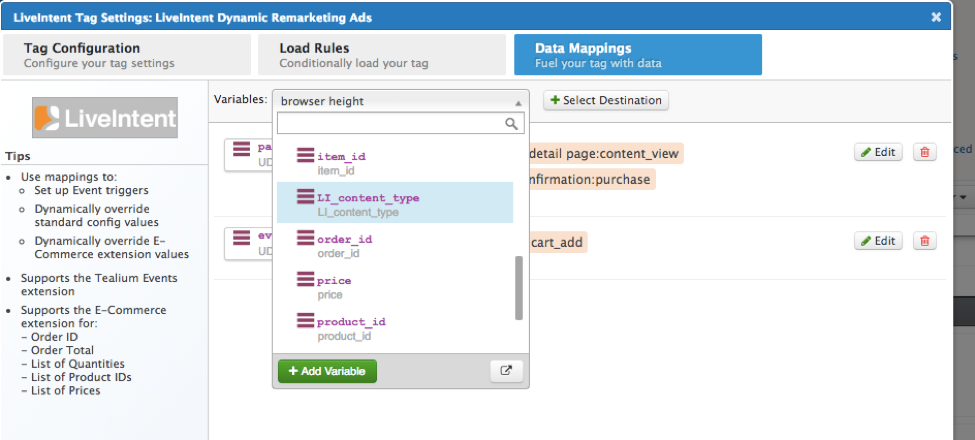
10. From the Event drop-down, select the first event you want to map content type to. Start with ViewContent.
11. From the Parameter drop-down, select Content Type.
12. Click the Add button and you’ll see a blue text field show up at the top of the Mappings wizard. This indicates your mapping was successful.

13. Click the Close button when you’re done, then click the Apply button to submit your mappings.
Note: You must still save and publish in order to keep your setup.
Setting up your Purchase Conversion Name
This will help LiveIntent distinguish between conversion events if you are (or plan to in the future) track or optimize to multiple conversion actions with LiveIntent.
1. Add a Set Data Value extension.
2. Give the extension a good title such as, “LiveIntent: Setting purchase_name_type”.
3. Set the scope of the extension to your LiveConnect Tag. Since this is only needed for the LiveConnect Tag, we only need to run this extension when the LiveConnect Tag loads.
4. Click the plus button next to the “Set” drop-down. This will allow you to create a data source on the fly.
5. Give this data source a name like “li_purchase_name” since the purpose of this data source is to provide the value for purchase_name.
6. Leave the To: field selection at “Text” and type “product_purchase” in the text field.
- You have created an extension that sets a data source with the proper value for name_type. Now you just need to add this new data source in the LiveConnect Tag’s mappings.
7. Click on the Parameters tab. This allows you to set up the parameter mappings for the event of your choice.
8. From the Data Sources drop-down, select your “li_purchase_name” data source.
9. Click on the Parameters tab. This allows you to set up the parameter mappings for the event of your choice.
10. From the Event drop-down, select the Conversion (purchase) event.
11. From the Parameter drop-down, select Content/Category/Conversion name.
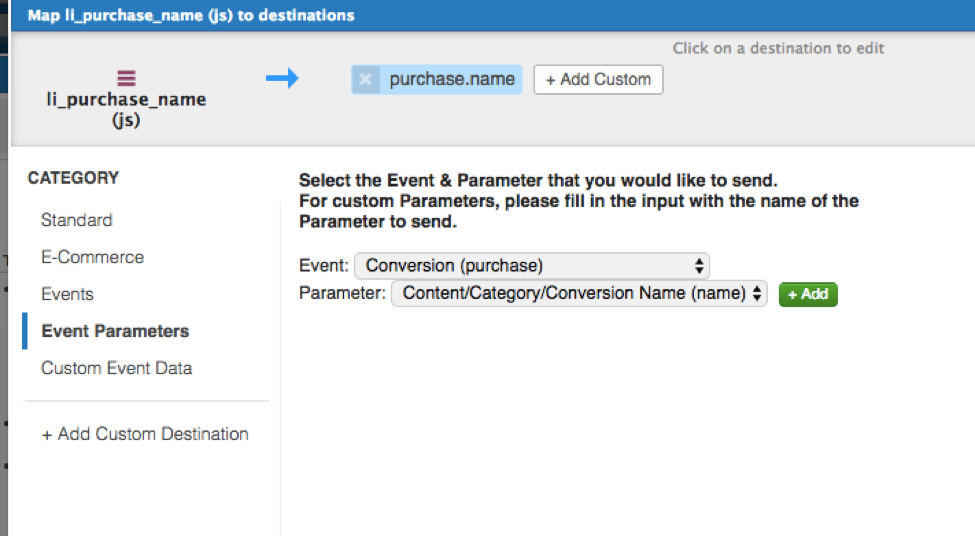
12. Click the Add button and you’ll see a blue text field show up at the top of the Mappings wizard. This indicates your mapping was successful.
13. Click the Close button when you’re done, then click the Apply button to submit your mappings.
Note: You must still save and publish in order to keep your setup.
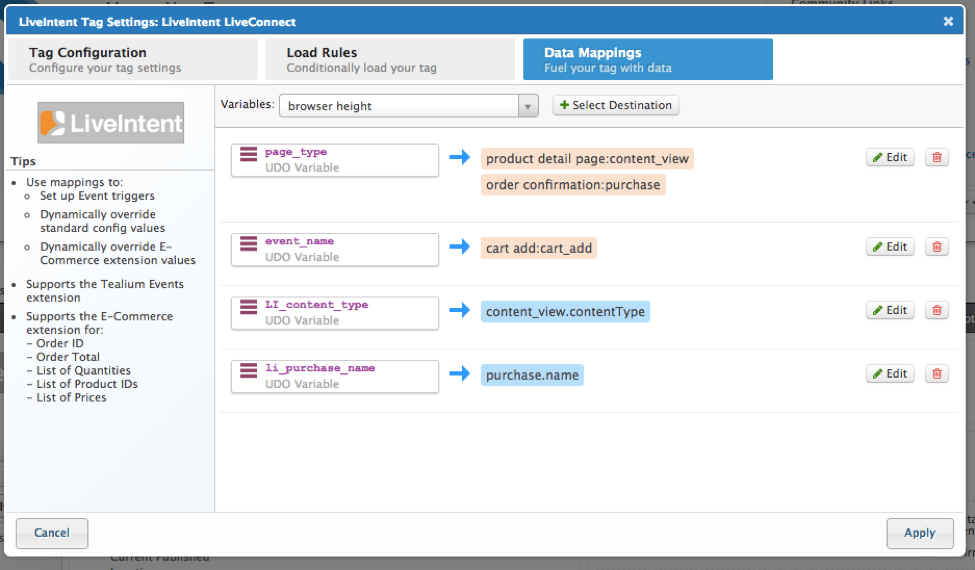
Your final set up should look something like: