Creating/Editing a Display & Native Ad Slot
Once your LiveTag has been implemented in your newsletter, you can follow the below steps to create your ad slot in order to begin serving display and native creatives from a variety of demand sources.
When setting up your ad slot, you can create either a Display ad slot or a Display & Native ad slot. We recommend setting up your ad slot to accept both Display and Native demand.
Getting started
To create an ad slot, navigate to the ‘Inventory Manager’ and click on ‘Create an Ad Slot’ in the Newsletter Overview. You can edit the Ad Slot by selecting ‘Edit’ in the Ad Slot detail view.
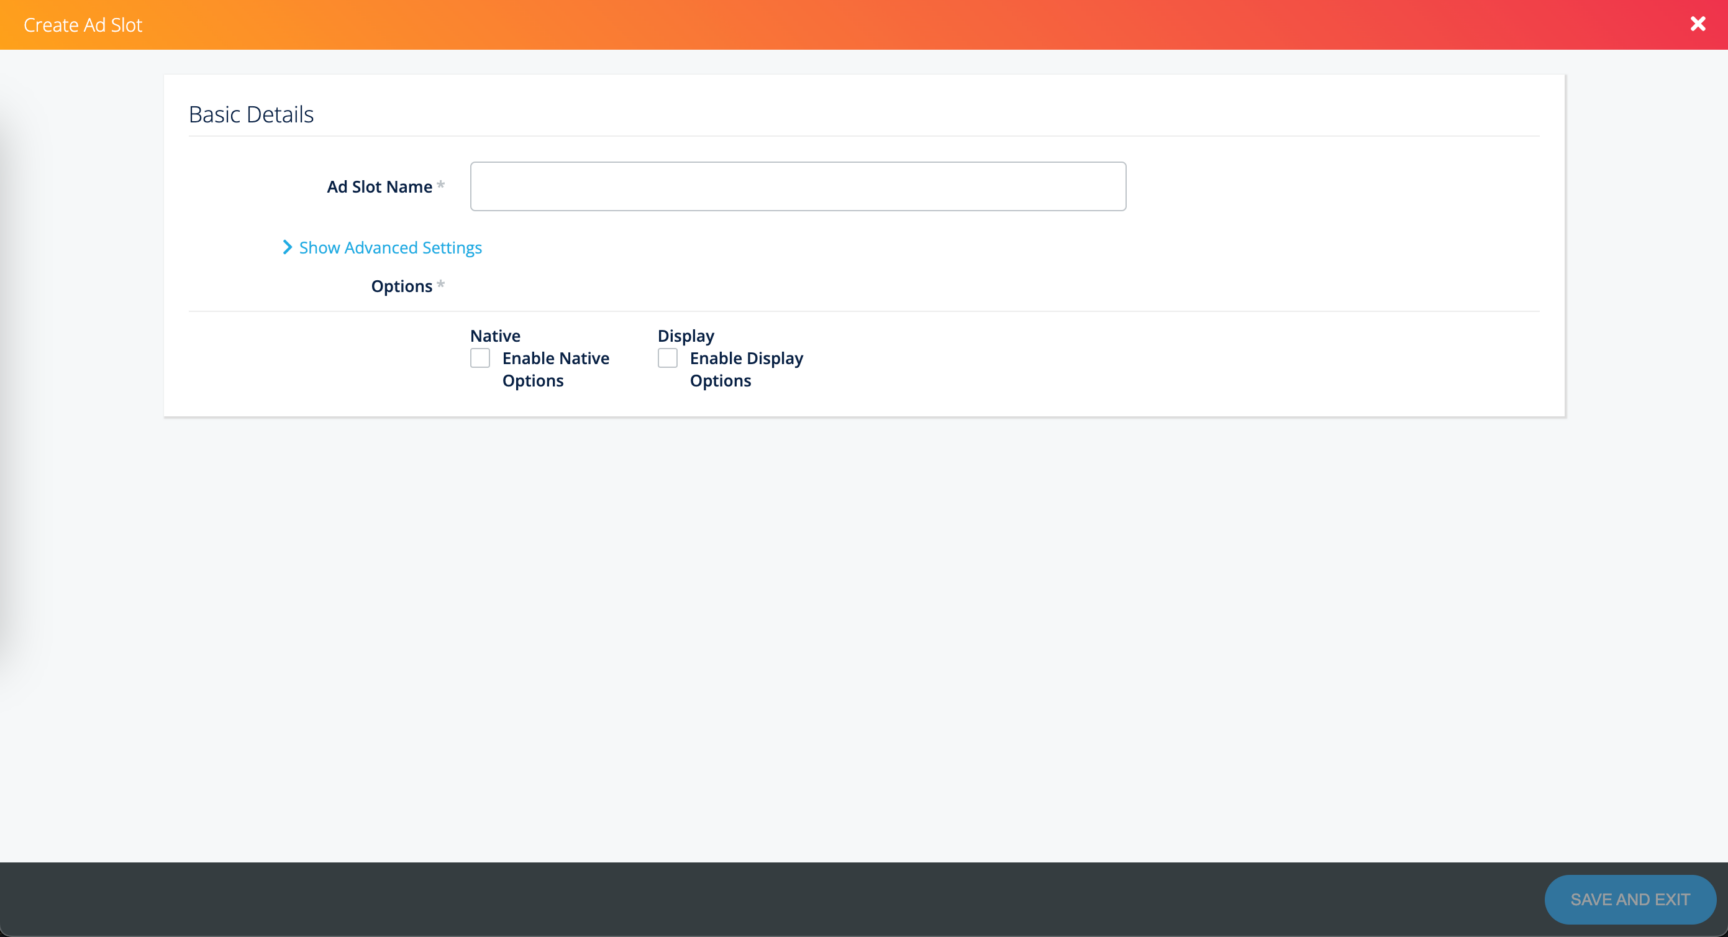
- Fill out the ‘Basic Details’ section
- Ad Slot Name: This will be the searchable name for your ad slot.
- Ad Type: Here you will be able to choose “Display” or “Display & Native” for your ad slot.
- Select your ad slot type
- Click the box next to “Native” and/or “Display” to enable demand options.
Creating a Display Ad Slot
If you choose ‘Display’ in the ‘Basic Details’ section, ‘Display Ad Slot Settings’ will appear on your screen. This section of the article will walk you through how to set up your display ad slot settings.
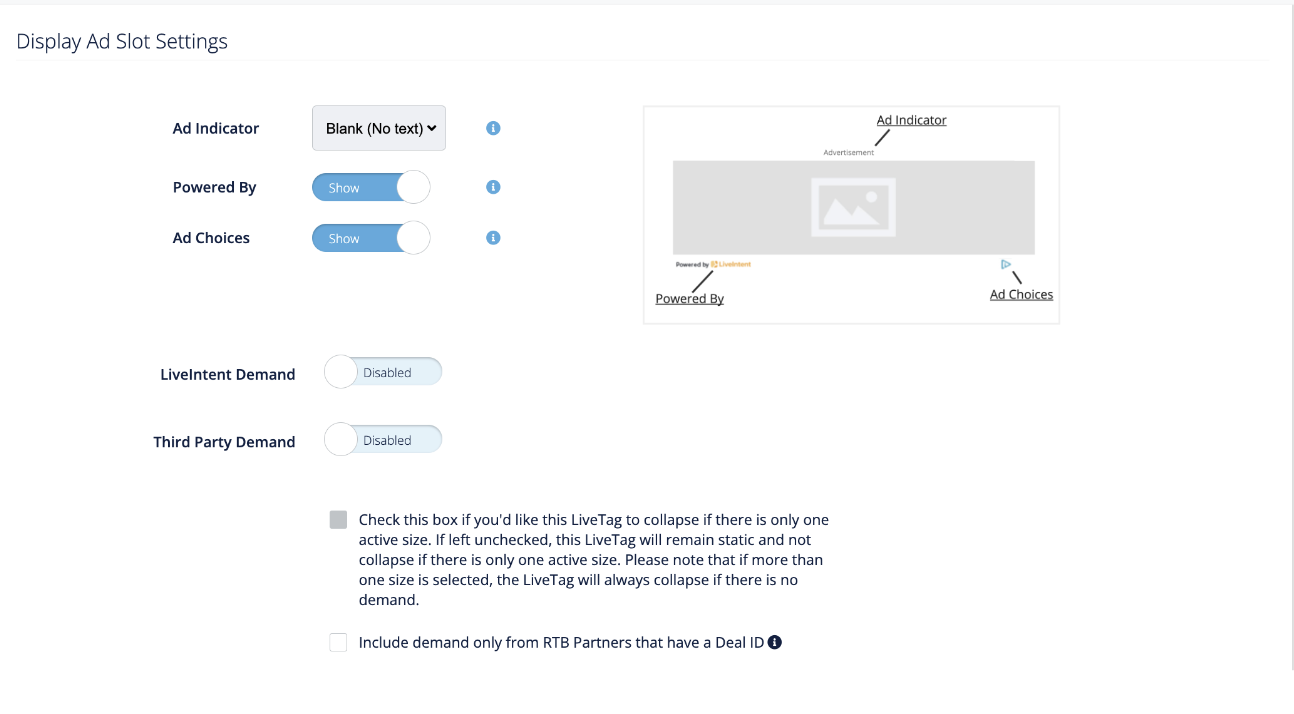
- Ad Indicator/Powered By/Ad Choices: Here you will have the option to enable the Ad Indicator, Powered By, and Ad Choices.
- Ad Indicator: If enabled, grayscale text will be included at the top of an ad slot that identifies the content as advertising. There are six options to choose from in the dropdown menu. Default is “Blank (No Text).”
- If enabled, the Ad Indicator:
- Will always appear ‘centered and above’ the ad slot
- Will always collapse with the LiveTag
- For best practices on how to implement the Ad Indicator, please refer to our setup guide.
- If enabled, the Ad Indicator:
- Powered By: A “Powered by LiveIntent” logo can be found at the bottom left of most ad slots. When clicked, it leads users to the LiveIntent ad choices page.
- For Display ads, this is toggled ‘On’ by default.
- Ad Choices: A program from the Digital Advertising Alliance aimed at giving consumers increased transparency around the ads they are served. Most often, the Ad Choices logo appears in the bottom right hand corner of each ad slot.
- For Display ads, this is toggled ‘On’ by default.
- If you have already added Powered By and Ad Choices to your newsletter footer, you can disregard. If you would like to move Powered By and Ad Choices to the footer, please reach out to your Publisher Development Specialist.
- NOTE: If you have already moved Powered By and Ad Choices to your newsletter footer, you can toggle both ‘Off’ here.
- Best Practice: LiveIntent recommends moving Powered By and Ad Choices to your newsletter footer where they will be always-on and won’t disrupt the flow from ads to your newsletter content.
- Please reach out to your LiveIntent account team about moving Powered By and Ad Choices to your newsletter footer.
- Ad Indicator: If enabled, grayscale text will be included at the top of an ad slot that identifies the content as advertising. There are six options to choose from in the dropdown menu. Default is “Blank (No Text).”
- Enable Demand: You have the option here to enable demand from the LiveIntent Exchange along with demand from Third Party DSPs.
- If you choose to enable “Third Party Demand” you will be able to choose which DSPs you want to open your inventory to in the next section.
- If you choose to enable “Third Party Demand” you will be able to choose which DSPs you want to open your inventory to in the next section.
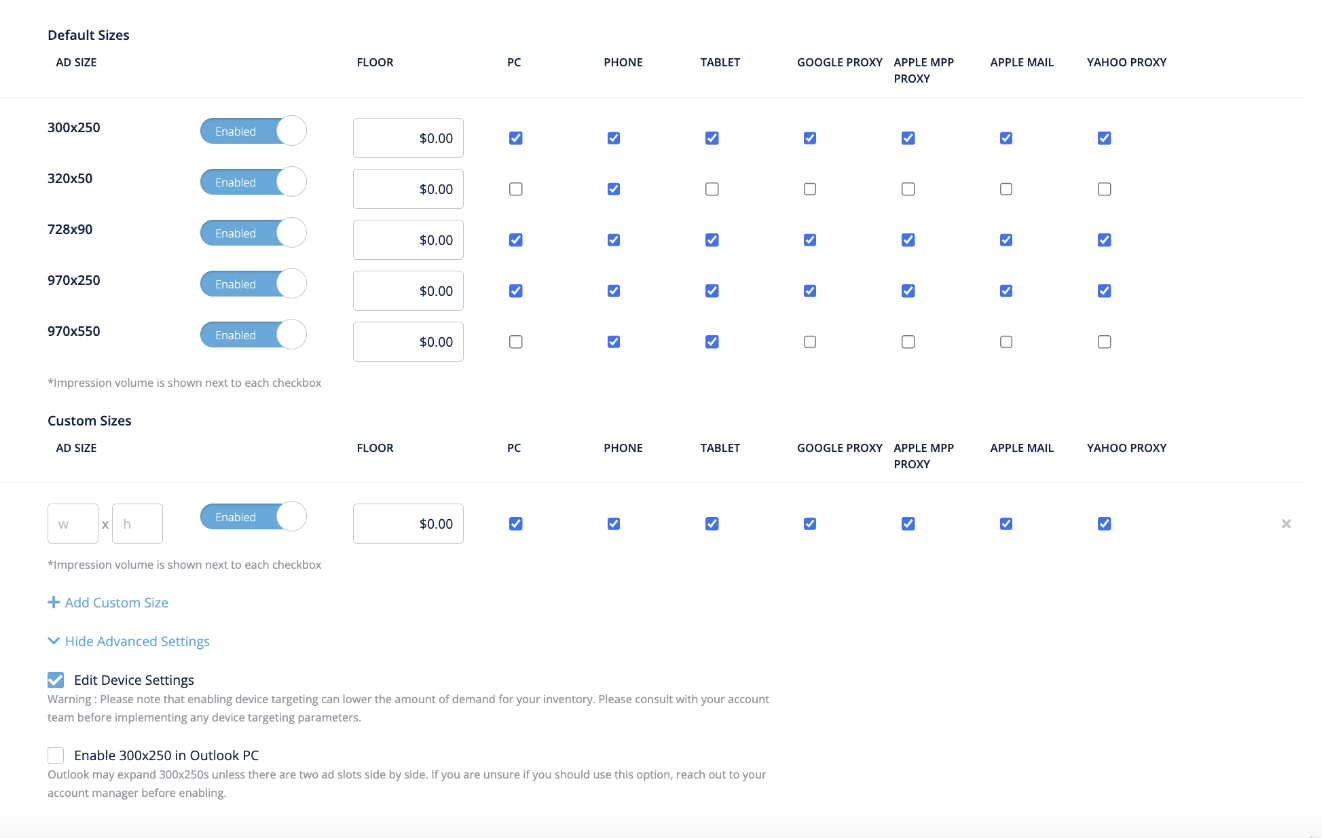
- Default Sizes: Select the ad sizes that you would like to allow to serve into the ad slot. You can choose from the pre-populated list of standard sizes, or add custom sizes. You can also set the floor for each ad size, and the device types that you want that ad size to serve on.
- If you select only a single size, the ad slot will default to being a static unit that will not collapse.
- If you’d like your single size ad unit to collapse, you can select the collapsibility checkbox.
- Here are the different scenarios for tag collapsibility:
- Ad slot with one size, and checkbox checked = unit will collapse
- Ad slot with one size, and checkbox is NOT checked = unit will remain static
- Ad slot with multiple sizes, and checkbox is checked = unit will collapse
- Ad slot with multiple sizes, and checkbox is NOT checked = unit will collapse
- You can also select ‘Make Ad Slot Private’.
- This will make the ad slot eligible for guaranteed direct-sold, house, and, direct deal ID demand only.
- Selecting this checkbox will make all exchange demand not utilizing a direct deal ID ineligible for the ad slot.
- Here you can also add floors for each ad size. If you would like the same floor added to all your enabled ad sizes, click ‘Copy to All.’
- Best Practice: Floors will have little impact on the quality of ads that are served — since low-quality ads tend to perform better, those advertisers have higher budgets and can spend more on their campaigns, getting around publisher floors. While adding a floor can lead to a higher CPM, it will cut into the available demand (including advertisers you do want), leading to a lower, and more inconsistent, fill rate, and a decrease in revenue. Instead of implementing a floor, we recommend utilizing LiveIntent blocking tools to better protect brand safety. Learn more about LiveIntent’s blocking tools here.
- Best Practice: Floors will have little impact on the quality of ads that are served — since low-quality ads tend to perform better, those advertisers have higher budgets and can spend more on their campaigns, getting around publisher floors. While adding a floor can lead to a higher CPM, it will cut into the available demand (including advertisers you do want), leading to a lower, and more inconsistent, fill rate, and a decrease in revenue. Instead of implementing a floor, we recommend utilizing LiveIntent blocking tools to better protect brand safety. Learn more about LiveIntent’s blocking tools here.
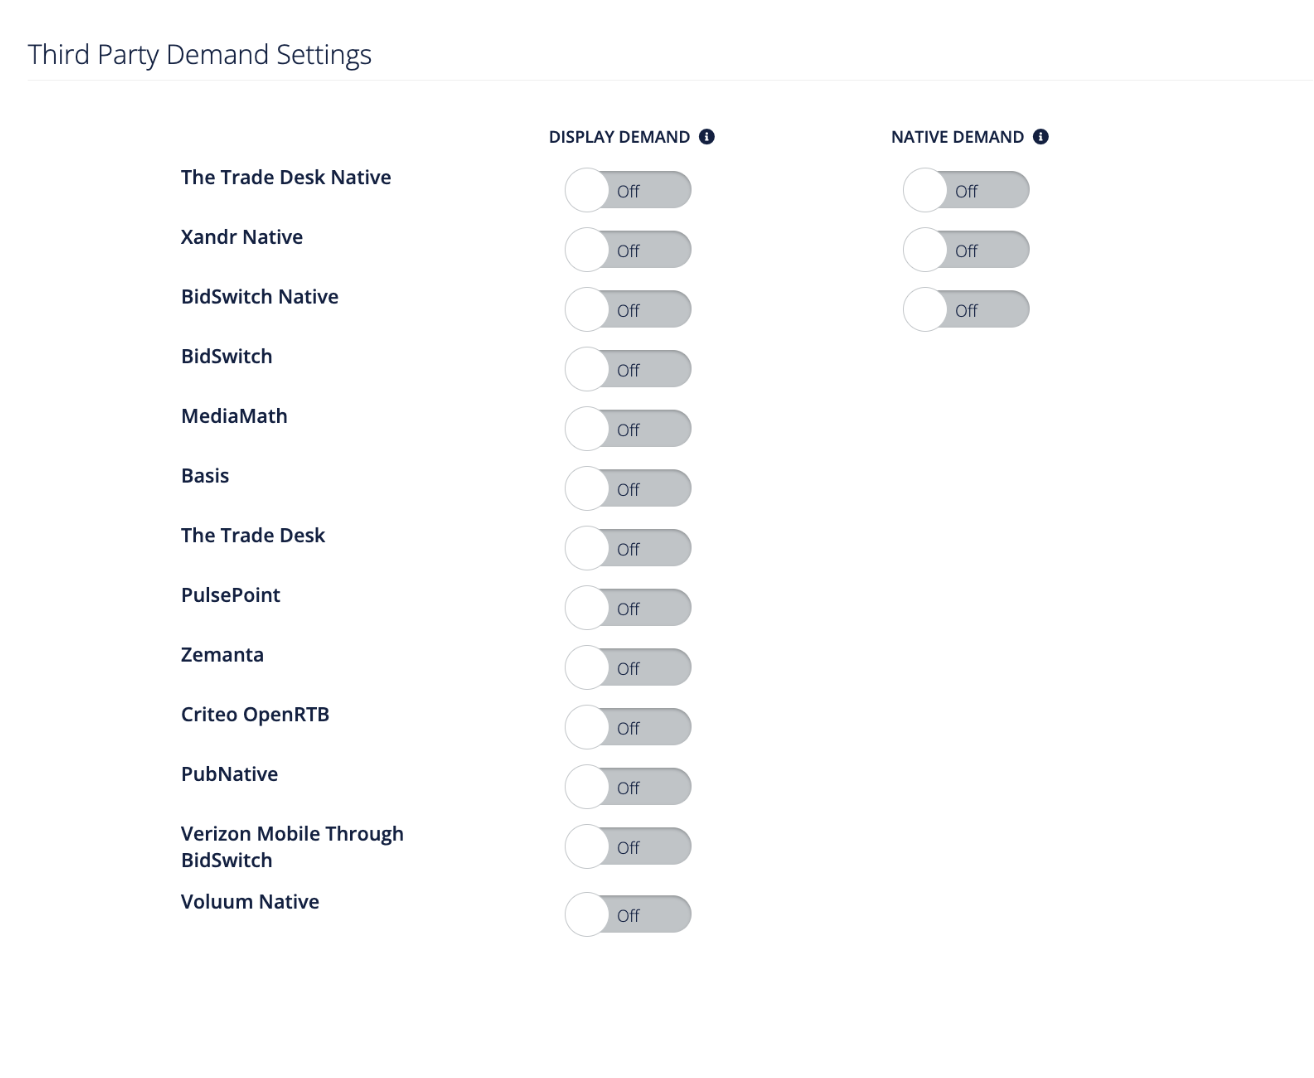
- If you chose to enable Third Party Demand above, you will now be able to toggle ‘on’ where you would like your demand to come from.
- NOTE: Since ad slots have the ability to serve both display and native demand, this section will show options for both. However if you only chose to enable ‘display’ or ‘native’ in the ‘Basic Details’ section above, you will only be able to toggle on demand for the creative type you chose.
- If you’re only creating a ‘Display’ ad slot, click ‘Save & Exit’
Creating a Native Ad Slot
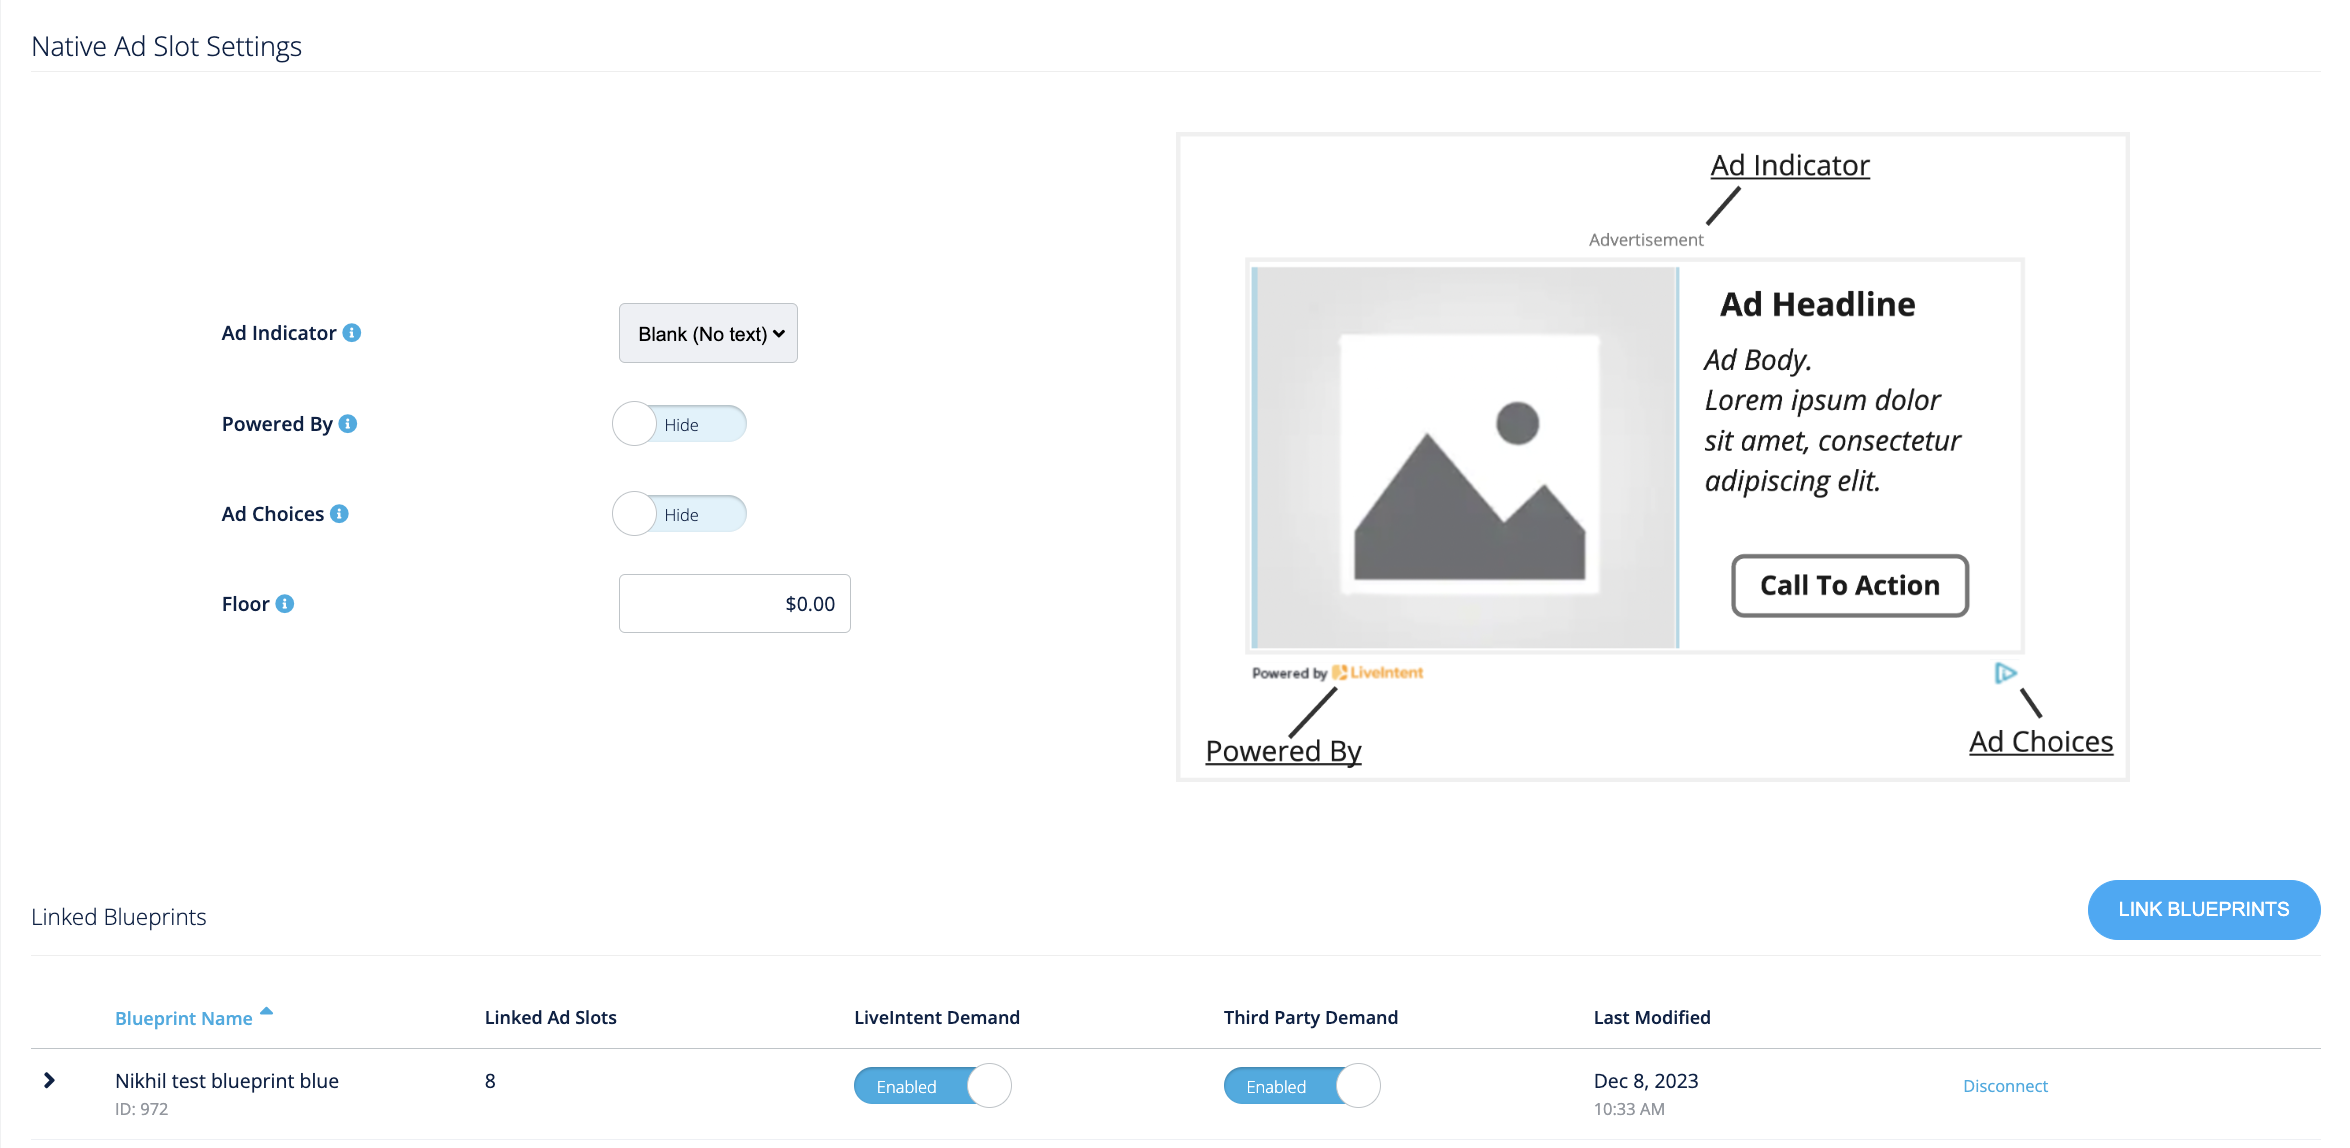
If you choose ‘Native’ in the ‘Basic Details’ section above, ‘Native Ad Slot Settings’ will appear on your screen. This section of the article will walk you through how to set up your native ad slot settings.
Before creating a native ad slot, make sure you have already set up your native blueprint with your LiveIntent account team. Your native blueprint will determine how creatives render within your native ad slot. If you have any questions about setting up your native blueprint, please reach out to your LiveIntent account manager.
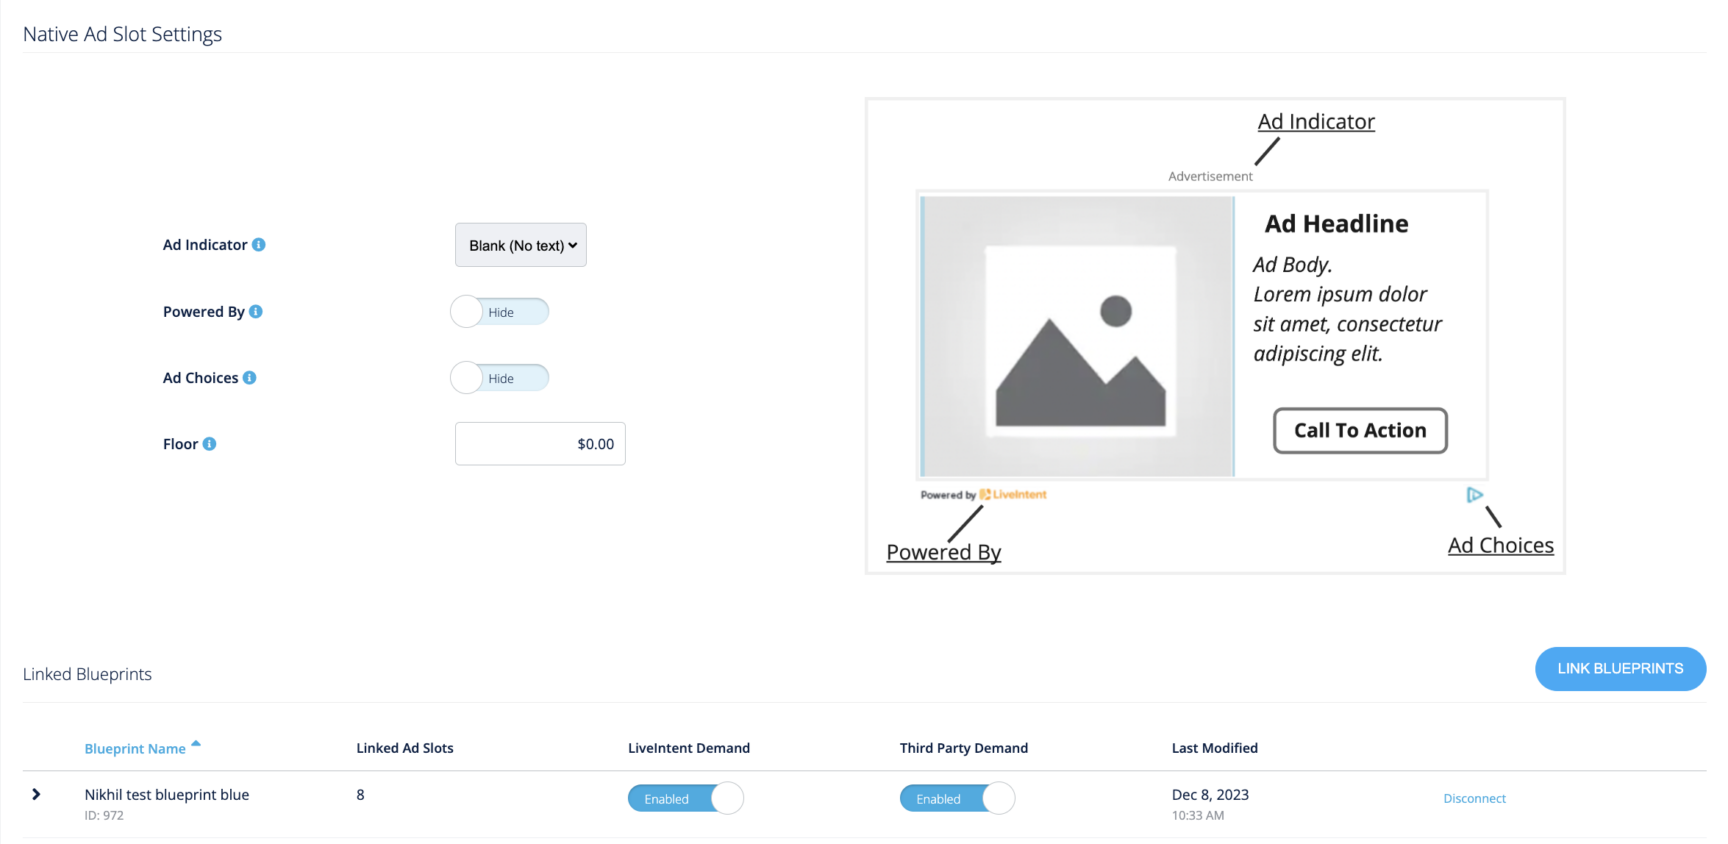
- Ad Indicator/Powered By/Ad Choices: Here you will have the option to enable the Ad Indicator, Powered By, and Ad Choices.
- Ad Indicator: If enabled, grayscale text will be included at the top of an ad slot that identifies the content as advertising. There are six options to choose from in the dropdown menu. Default is “Blank (No Text).”
- If enabled, the Ad Indicator:
- Will always appear ‘centered and above’ the ad slot
- Will always collapse with the LiveTag
- For best practices on how to implement the Ad Indicator, please refer to our setup guide.
- If enabled, the Ad Indicator:
- Powered By: A “Powered by LiveIntent” logo can be found at the bottom left of most ad slots. When clicked, it leads users to the LiveIntent ad choices page.
- For Display ads, this is toggled ‘On’ by default.
- Ad Choices: A program from the Digital Advertising Alliance aimed at giving consumers increased transparency around the ads they are served. Most often, the Ad Choices logo appears in the bottom right hand corner of each ad slot.
- For Native ads, this is toggled ‘Off’ by default.
- If you have already added Powered By and Ad Choices to your newsletter footer, you can disregard. If you would like to move Powered By and Ad Choices to the footer, please reach out to your Publisher Development Specialist.
- NOTE: If you have already moved Powered By and Ad Choices to your newsletter footer, you can toggle both ‘Off’ here.
- Best Practice: LiveIntent recommends moving Powered By and Ad Choices to your newsletter footer where they will be always-on and won’t disrupt the flow from ads to your newsletter content.
- Please reach out to your LiveIntent account team about moving Powered By and Ad Choices to your newsletter footer.
- Ad Indicator: If enabled, grayscale text will be included at the top of an ad slot that identifies the content as advertising. There are six options to choose from in the dropdown menu. Default is “Blank (No Text).”
- Floor: Here you can set the floor for your native ads. This floor can be different from the one you use for your display demand.
- Best Practice: Floors will have little impact on the quality of ads that are served — since low-quality ads tend to perform better, those advertisers have higher budgets and can spend more on their campaigns, getting around publisher floors. While adding a floor can lead to a higher CPM, it will cut into the available demand (including advertisers you do want), leading to a lower, and more inconsistent, fill rate, and a decrease in revenue. Instead of implementing a floor, we recommend utilizing LiveIntent blocking tools to better protect brand safety. Learn more about LiveIntent’s blocking tools here.
- Linked Blueprints: Click on ‘Link Blueprints’ to select the blueprint(s) to attach to this ad slot.
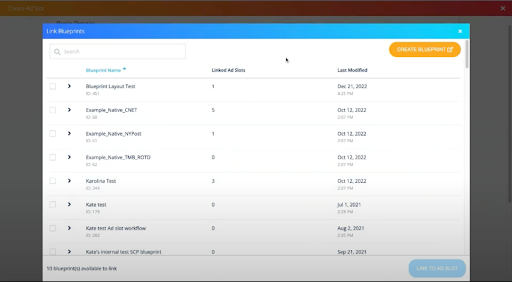
- The ‘Link Blueprints’ pop-up screen will appear where you’ll be able to view all of your blueprints and choose the one to link to your ad slot.
- NOTE: Up to ten blueprints can be linked per ad slot. Blueprints can be linked to multiple ad slots at the same time.
- NOTE: Blueprint settings can only be edited in the ‘Create Ad Slot’ or ‘Edit Ad Slot’ page. You will not be able to make any changes to a blueprint on the ‘Ad Slot Details’ page. If you need to make any updates to an ad slot or blueprint, click ‘Edit’ at the top of the ‘Ad Slot Details’ page.
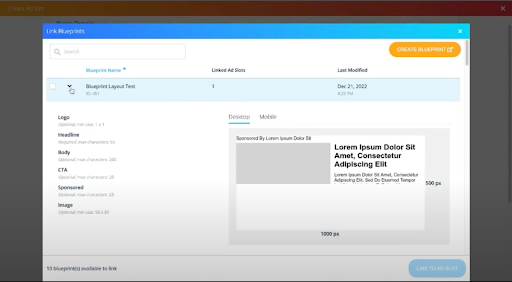
- By clicking the arrow drop-down next to the blueprint name, you can view your blueprint and its details.
- To add blueprints to your ad slot, check off the boxes on the right-hand side of the screen. Once you’ve made your selections, click the blue ‘Link to ad slot’ button.
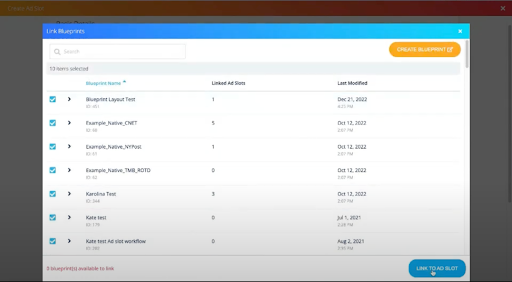
- You will be brought back to the ‘Create Ad Slot’ page where you will now see your linked blueprints.
- The ‘Link Blueprints’ pop-up screen will appear where you’ll be able to view all of your blueprints and choose the one to link to your ad slot.
- Next to each blueprint, you will see five columns:
- Linked Ad Slots: This number shows the number of ad slots this blueprint is linked to.
- LiveIntent Demand: Toggle to ‘Enabled’ to allow native demand from LiveIntent’s Exchange to serve into this ad slot.
- Third Party Demand: Toggle to ‘Enabled’ to allow native demand from Third Party DSPs to serve into this ad slot.
- Last Modified: This date is the last time the blueprint was changed.
- Disconnect: Click the blue ‘Disconnect’ and the blueprint will no longer be linked to the ad slot.

- If you chose to enable Third Party Demand above, you will now be able to toggle ‘on’ where you would like your demand to come from.
- NOTE: Since ad slots have the ability to serve both display and native demand, this section will show options for both. However if you only chose to enable ‘display’ or ‘native’ in the ‘Basic Details’ section above, you will only be able to toggle on demand for the creative type you chose.
- Click ‘Save & Exit’
Your ad slot is now set up and ready to receive demand!
NOTE: Please make sure that [email protected] is subscribed to your mailing lists and that you have sent an activation email to [email protected].
If you have any questions, please reach out to your LiveIntent Account Team.